Different ways exist to start a slide show. Once a slide show is running, you can take control pressing keys or clicking the mouse buttons.
By default, a slide show always starts with the first slide. You advance manually through slides up to the last slide. You can change these settings.
Choose Slide Show - Slide Show to run the show.
If you want all shows to start from the current slide instead of the first slide, choose Tools - Options - Trine Office Impress - General and click Always with current page.
Click to advance to the next effect or to the next slide.
Press Esc to abort the show before the end.
Many more keys are available to control a slide show. You can also right-click to open a context menu with useful commands.
For an automatic change to the next slide, you must assign a slide transition to each slide.
Open the Slide Transition sidebar deck.
In the Advance slide area, click Automatically after, and select a time duration.
Click Apply to All Slides.
You can assign a different time for every slide to advance to the next slide. The rehearse timings feature can assist you to get the timing right.
To advance to the first slide, after all slides have been shown, you must set the slide show to repeat automatically.
Choose Slide Show - Slide Show Settings.
In the Type area, click Auto and select a pause time between shows.
You can start Trine Office from a command prompt, followed by the parameter -show and an Impress filename. For example, to start the file filename.odp from the command prompt, enter the following command:
soffice -show filename.odp
This assumes that soffice is in the program path of your system, and that filename.odp is located in the current directory.
To enable the Presenter Console:
Choose .
Select Enable Presenter Console in the Presentation area.
To activate the Presenter Console:
Connect an auxiliary display to your computer,
Run the slide show. Press F5 or Shift-F5 or choose or .

Previous: move to previous slide.
Next: move to next slide.
Notes: display the Presenter Console Notes mode.
Slide: display the Presenter Console Slide sorter mode.
Restart: restart the slide show’s elapsed time.
Exchange: Switch the displays between the computer and the presentation display.
Close: In the Notes and Slide Sorter mode, return to the Normal mode.
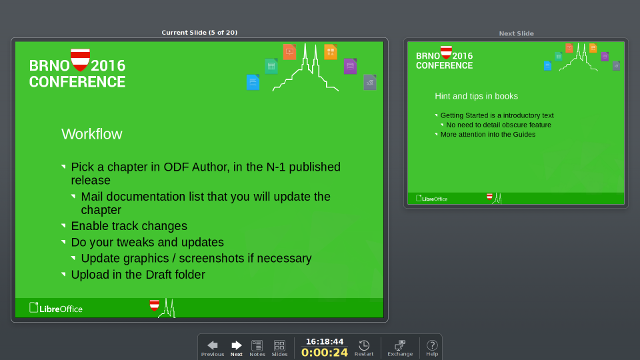
The Normal mode shows the current slide on the left and the next slide on the right of the computer display.

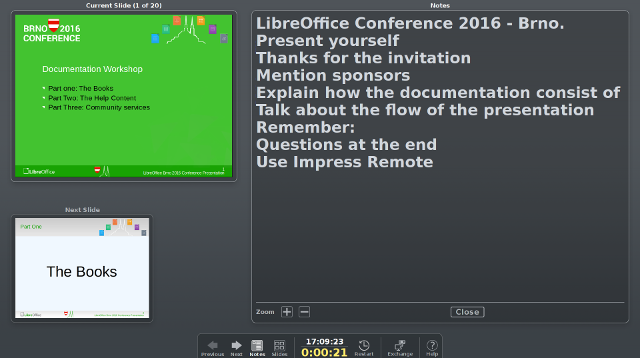
The Notes mode displays the current slide on the left, the slides notes on the right and the next slide below the current slide.

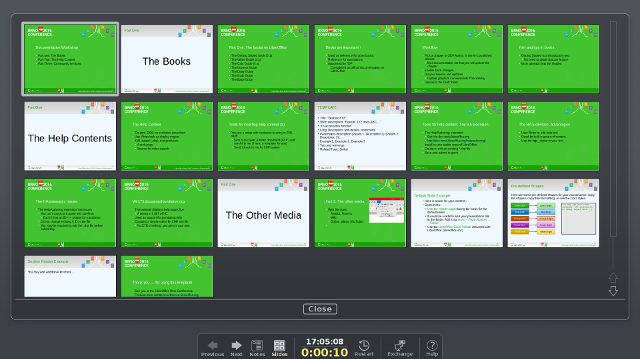
The Slide Sorter mode displays all slides in the computer screen and allows to display the selected slide out of the presentation order.

Trine Office Impress Remote is an open-source application available for the Android and iOS operating systems, which lets you control Trine Office Impress slideshows with a mobile device.
![]()
Impress Remote displays slide thumbnails in the device screen with any corresponding notes below. Flick your finger on the screen to go forward or backward in the presentation. You can also display a mosaic of slides to jump directly to the desired one for easier presentation dynamic.
The connection between the computer running the Trine Office Impress presentation and the mobile device is done through Bluetooth or a network link.
Impress Remote is a very useful application to let you control slideshows at a distance of the computer, enabling you to walk while doing your presentation. Its main features are:
Control the slideshow with finger gestures and taps on the mobile device screen.
Slide object animations are triggered with taps on the mobile screen.
Slide previews: the presentation slides can be previewed in the mobile device when both the computer and device are connected.
Speaker notes: there is an exclusive speaker notes section below the slides on your device where all the slide notes are displayed.
Timer: sets the time a slide is displayed for automatic slide shows.
Visual pointer: display a “laser pointer” on the computer screen, controlled by your finger’s position on the slide thumbnail on the mobile device.
GNU/Linux, Windows or macOS.
Bluetooth or network connectivity.
LibreOffice version 4.1 or higher.
A phone or tablet with Android 2.3 or higher or iOS, with Bluetooth or network connectivity.
Impress Remote application installed in the mobile device.
Download Impress Remote from the Google Play Store or the Apple Store by searching for “Impress Remote” in the search box. Be sure that the results bring Impress Remote from The Document Foundation (TDF). Install Impress Remote in the mobile device as with other mobile applications.
With Impress Remote enabled in the mobile device and in the Computer page, access the Setting page by tapping the right corner of the screen. The following settings are available:
Volume key actions: check to enable the device’s volume keys to go forward when pressing the volume-up button and move backward when pressing the volume-down button.
Keep screen on: check to prevent the automatic screen off and device from automatically locking while using Impress Remote.
Quiet mode: put the device in silent mode to avoid audio notifications of incoming calls or other messages. This setting does not affect the vibration mode you may have previously set.
Enable Bluetooth on both the device and the computer and pair them. Refer to the instructions manuals of your device and your computer operating system to know how to enable Bluetooth, set up a Bluetooth identifier and pair devices. Once the pairing is established, the mobile device is ready to control the presentation.
Alternatively, you can connect through a network (including Wi-Fi). In this case, both the computer and the device must be connected to the same network.
To run an Impress slideshow, you must allow Impress to be controlled by the mobile device. Proceed as follows:
Open LibreOffice Impress.
Go to . You should see the screen depicted in the figure below.
In the presentation options, select the Enable remote control checkbox and click OK.
Close LibreOffice Impress and start it again.
Disable screen saving and screen locking from the mobile device as indicated above before running a slideshow. Ensure that the mobile device has enough battery power for the show’s duration with the screen on.
Make sure both device and computer are already paired via Bluetooth or network connection.
Open the presentation you want to show in LibreOffice Impress.
Open the Impress Remote application on the mobile device and select the Bluetooth ID of the computer.
Once you clicked on the computer’s name, it will automatically load the presentation slides on the Impress Remote with the notes section.
Flick your finger left or right on the mobile screen to change the slides. Slide notes are in the bottom part of the mobile screen.
Optionally, set the timer for defining each slide’s display time from the mobile application.
The slides can also be changed with the volume keys on the mobile device. To enable it, open the settings and enable volume key actions in the Impress Remote.
You can create custom slide shows to meet the needs of your audience using slides within the current presentation.
Choose Slide Show - Custom Slide Shows.
Click New and enter a name for your slide show in the Name box.
Under Existing Slides, select the slides to add to your slide show, and click the button. Hold down Shift to select a range of consecutive slides, or Ctrl to select multiple individual slides.
You can change the order of the slides in your custom slide show, by dragging and dropping the slides under Selected Slides.
Choose Slide Show - Custom Slide Show.
Select the show you want to start from the list.
Click Start.
If you want the selected custom slide show to start when you click the Slide Show icon on the Presentation toolbar, or when you press F5, select Use Custom Slide Show.
Choose Tools - Options - Trine Office Impress - General.
In the Start presentation area, select the Always with current page check box.
Do not select this option if you want to run a custom slide show.
To hide the current slide, click the Hide Slide action button.
To hide several slides, choose View - Slide Sorter, and then select the slide(s) that you want to hide.
Choose Slide Show - Show/Hide Slide.
The slide is not removed from your document.
Choose View - Slide Sorter, and then select the hidden slide(s) that you want to show.
Choose Slide Show - Show/Hide Slide.
Open a presentation, and switch to Slide Sorter View.
Start the show with the Rehearse Timings icon in the Slide View bar. You see the first slide, and a timer in the bottom corner.
When it's time to advance to the next slide, click the timer. To keep the default setting for this slide, click the slide, but not the timer. Continue for all slides in your presentation.
Trine Office has recorded the display time for each slide. Save your presentation.
If you want the whole presentation to auto-repeat, open the menu Slide Show - Slide Show Settings. Click Loop and repeat after and OK.